Wednesday, January 31, 2018

Goosechase PE style


Our district hosted a technology conference January 29th.  Staff members from all of the schools shared tips, tricks and inventive ways to integrate technology to make their lessons more engaging.  One of the favorite sessions of the day came from two of my co-workers.  They taught participants how to use Goosechase.

Goosechase is a scavenger hunt app.  Participants have certain tasks they must complete.  You take a picture of the task being completed as your proof.  The session my coworkers presented took place in an elementary gym.  They had teachers and administrators dunking into kid-sized goals, giving piggy back rides, throwing balls - the pictures were hilarious.  To be declared the winner, you must have the most points.  I have to say some of the teams REALLY wanted to win.  

Anyway, back to my point for the article.  One of our PE teachers participated in the session and loved it.  He had a lesson coming up that wasn't the most exciting and he wanted to "jazz" it up a bit by doing a Goosechase.  

He came down to the media center one morning and we set up the accounts and I helped him get started creating the tasks.  At the time he did the Goosechase, teachers could set up a free Goosechase with 5 participants.  He chose to set those up as teams.  Each team had to work together to complete all of the tasks.  

This was something different and fun for the students.  They loved it.  All day, you saw his different classes all over the building trying to get what they needed.  They were totally immersed in what they were doing- everyone was on task.  

One of the things I loved about this activity was that most of the building saw groups of students completely engaged in an activity that went beyond the basic Google EDU apps.  It caused a couple of other teachers want to think out of the box as well.  There is life outside of Google.  The best part is, you don't have to be an expert in everything.  Give the students a starting point and they can do the rest.

Saturday, January 27, 2018

I-Innovate Night


Back in December our school hosted an i-Innovate night.  This provided parents and the community with a glimpse of some of the tools available to our students.  It provides students with a chance to show off what they have learned.

I had a group of students to help me in the media center.  Their job was to demonstrate how to use our spheros, our 3D pens, share projects made on the 3D printer and serve as photographers in our green screen holiday photo booth.  

The two stations of our visitors seemed to enjoy the most were our 3D printed earrings and our holiday photo booth.

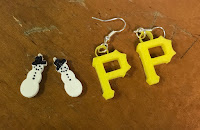
Since the holidays were right around the corner we used our 3D printer to print snowmen and the ever-present Perquimans "P".  The station was set up with pliers, jump rings, earring wires and of course the designs.  Parents and students alike strolled out of the media center with their set of highly fashionable earrings 3D printed earrings.  

Our green screen was set up in the main part of the media center.  The students helped me to choose a copyright friendly background from Pixabay and served as the photographers that evening.  Students would have the family choose
the background, take their picture and email it to them.  I loved hearing the students instruct people on where to stand, to smile and generally tell them what to do.  I think they enjoyed it a bit themselves.  The highlight of the photo booth was when our Superintendent stopped by and had his picture taken.  

Thursday, January 25, 2018

Bringing History to Life

I love working with my Social Studies teachers.  They are willing to try almost anything to get their students engaged.  Our 8th grade Social Studies teacher was working on a Civil War Battles unit with his students.  Students had to complete a project that provided information regarding a battle.  They had to list the location, which side won, what led up to the specific battle, casualties and such.  Students had to have some time of artifact to present along with their project.  Some of their options included:
1) Design and create a monument/ artifact in Tinkercad to be printed on our 3D printer.
2) Create a monument or battlefield in Minecraft.
3) Create a newscast where the reporter is coming "live" from the scene of a battle.

I have to say that the products created from this project have been some of my favorites so far.  What I'm noticing is that when the teacher provides them the opportunity to be creative, they come up with some pretty amazing things.

3D Printed items
Students really took the creation of their 3D items seriously and challenged me a bit along the way.  We learned some valuable lessons about the scale of items created in Tinkercad and how to use SVG files and Inkscape to create intricate designs.

With scale, one of the monuments a student created was 300mm x 800mm.  We had to have a quick lesson about millimeters, centimeters and inches in order to make the monument printable.

Another student wanted to not only make a cannon, but a rolling cannon.  The student creating this had to consider where to put the axle so the cannon wouldn't tip over.  He had to take precise measurements of the axle and the hole in the cannon so it would roll.  He also learned how to create an SVG file in Inkscap and then transfer it to Tinkercad to make the wheels.  I helped him to use the 3D pen to "weld" the wheels to the axle.  The result was pretty awesome.

Minecraft Battle Memorials
While only a few students opted to create a 3D printed design, more students chose to create monuments and battlefields in Minecraft.  I am constantly amazed at what students create with what amounts to different types of cubes.


Green Screen Newscast
Only one group decided to do a newscast from the battlefield, but it was priceless.  The girls didn't want to be seen on camera and the only puppet I had was Miss Piggy.  She became their star!  Their script included a news desk scene and one on site.  They wanted the correspondent to be a male.  To transform Miss Piggy, the girls sewed their own jacket for her and gave her a mustache.  Their script was mainly facts with a little bit of sideways humor thrown in.  The result - hamtastic!

Everything We Touch Turns To GOLD!

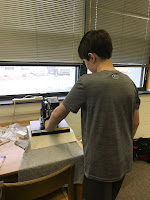
student weeding their design printed on the CircuitWe've had a lot of fun in our Makerspace since the equipment has arrived.  One thing that has been a big hit has been the ability to make our own Tshirts.  We were lucky enough to secure a local grant that helped us purchase a Cricut, a heat press, and supplies. 

Our yearbook class took full advantage of the resources to create their "official" yearbook staff Tshirts.  The students worked with their teacher to design the shirts, watched the designs being cut out on the Cricut, weeded the design for their shirt and then used the heat press to complete the process.


student using our heat press to press their design on their tshirt

Wednesday, January 24, 2018

Prehistoric Man Activity

What was life like for prehistoric man?  They couldn't run to Wal-Mart to get supplies or to Food Lion to buy groceries, so what did they do?  The short answer is that they had to use the resources

that were directly available to them.

For this activity, I teamed up with our 6th grade social studies teacher.  Students would have to work together to create a shelter using only the resources available.
 The original plan had been for us to do this outside and use the things students found on the ground, but rainy conditions threw a kink into our plans.  Instead, we used items from our makerspace kit - popsicle sticks, bits of string, and pompoms to represent food and water.

Here's the activity:
Students were grouped together as strangers from nearby tribes that did not speak the same language.  They had to work together using hand gestures, facial expressions, and sounds (not words) to build a shelter for their group.

Popsicle sticks, bits of string, and a few other items were scattered all over the floor.  Each group was given an area that served as their settlement.  They could only use the resources in their area to create the shelter.  They were not allowed to remove items from the "land" of a neighboring tribe because doing so would cause a feud.

Most teams were successful in creating some sort of structure in the allotted time, but not all.  Teams without a strong leader or those who failed to find a way to communicate with one another struggled the most.

Learning to Code with Spheros

My Friday afternoon Makerspace Club is always a lot of fun.  Students love to see what they can create or build.  This week we practiced programming the Spheros to prepare for a game of Sphero Simon Says.

Each team was provided a Sphero, an iPad and a directions sheet that listed all of the tasks they
would need to perform during our game.  Each team member had to make sure they understood the commands they needed to program their Sphero.  I was there to help if students needed to know how to create the program.

When the practice time was up, teams lined up to show off their skills.  I called out a command (ex.  Roll forward for 5 secs and turn the light to green.).  Students were given a specific amount of time to perform the task.

If there were still several teams left standing, we broke the tie by playing a quick game of Sphero Chaos Bowling.  To play, I set up bowling pins we created on our 3D printer.  All of the Spheros line up.  When I say go, the first Sphero to knock down the most pins - Wins!

Tuesday, January 23, 2018

Native American Projects With Mr. G

Sometimes a collaboration with a teacher doesn't require a full blown planning session.  It can just be the result of a conversation.  That's how it works most of the time when I work with Mr. Gemmill, our 7th grade social studies teacher.  He was telling me about his Native American project where students would need to create an artifact and retell a folktale from their tribe.

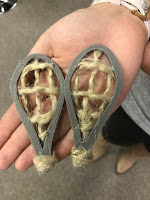
The student created the snowshoe outline in Tinkercad and used her own thread to weave snowshoes.From that conversation, we talked about using the 3D printer for students to design and create their own artifact as well as use the green screen with groups who wanted to make a movie of their folktale.  What happened over the next couple of weeks resulted in a pretty amazing collaborative project.

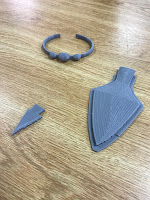
During the time we worked on this project, the students kept our 3D printer working steadily mostStudents used Tinkercad and Thingiverse to create or find artifacts for their Native American projects days.  A few students pulled ready made designs from Thingiverse.  With those designs, students had to scale down some of the models using Tinkercad.  Other students chose to use Tinkercad to create their artifacts from scratch.    Students learned to manipulate the shapes to create their designs that you see in the pictures below.  The most involved projects included students creating an image in Inkscape and importing it into Tinkercad to manipulate.  Some of the projects created by the students on the 3D printer include:
- arrowheads
- Native American jewelry
- miniature tomahawk
- snowshoes - designed from scratch using Inkscape to create the outline in svg format to import into Tinkercad
- feather - used Inkscape to create the svg file and imported into Tinkercad
- vase


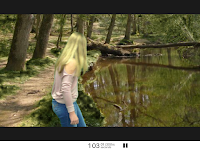
Students used Doink- a green screen app to help them recreate Native American folk tales.The 3D printed items were a challenge because we had to learn to manipulate the software in a short period of time, but green screen projects were probably my favorite.  For this project, students were to recreate a Native American folktale.  Students created a script to put the story in their own words.  They came up with props, wardrobe changes and the backgrounds for the various scenes.  The final product was a 3-5 minute video that was definitely screen worthy.  :)
Students used Doink- a green screen app to help them recreate Native American folk tales.
Collaborations don't have to be a long drawn out process.  Just a quick conversation can result in incredible projects that students want to complete and do an amazing job doing so.

You Are Not Alone. 3 Ways to Expand Your PLN.

Do you find yourself feeling a bit lonely or isolated being the only librarian at your school?   If you work in a small district, you may ...